<?xml version="1.0" encoding="utf-8"?><feed xmlns="http://www.w3.org/2005/Atom" ><generator uri="https://jekyllrb.com/" version="4.3.3">Jekyll</generator><link href="https://www.nicovermeir.be/feed.xml" rel="self" type="application/atom+xml" /><link href="https://www.nicovermeir.be/" rel="alternate" type="text/html" /><updated>2026-03-31T13:33:33+00:00</updated><id>https://www.nicovermeir.be/feed.xml</id><title type="html">Nico’s Digital Footprint</title><subtitle>blog, resume, portfolio, training, workshops, speaker, .net, architecture</subtitle><author><name>Nico Vermeir</name><email>nico_vermeir@hotmail.com</email></author><entry><title type="html">Getting started with the Dapr .NET SDK</title><link href="https://www.nicovermeir.be/dapr/2024/04/03/dapr-dotnet-sdk-getting-started.html" rel="alternate" type="text/html" title="Getting started with the Dapr .NET SDK" /><published>2024-04-03T12:59:18+00:00</published><updated>2024-04-03T12:59:18+00:00</updated><id>https://www.nicovermeir.be/dapr/2024/04/03/dapr-dotnet-sdk-getting-started</id><content type="html" xml:base="https://www.nicovermeir.be/dapr/2024/04/03/dapr-dotnet-sdk-getting-started.html"><![CDATA[<h2 id="intro">Intro</h2>
<p>In this post, we’ll take a look at the Dapr .NET SDK. Dapr is a portable, event-driven runtime that makes it easy for developers to build resilient, microservices applications.</p>

<p>Dapr can be used with any language that can make HTTP requests. However, Dapr also provides SDKs for Go, Java, .NET, Python, and JavaScript. These SDKs provide a more programming language-driven way to interact with Dapr. However, documentation on the .NET SDK is a bit sparse. In this post, we’ll take a look at how to get started with the Dapr .NET SDK.</p>

<h2 id="prerequisites">Prerequisites</h2>
<p>This post assumes that you already have Dapr installed. If you don’t have Dapr installed yet, you can follow the instructions on the <a href="https://docs.dapr.io/getting-started/">Dapr website</a>.</p>

<h2 id="setting-up-the-project">Setting up the project</h2>
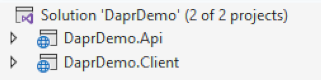
<p>For this post we’ll be using a simple setup with an ASP.net minimal API as a backend, and a Blazor application as frontend. The demo solution looks like this:</p>

<p><img src="/assets/images/posts/20240403/001.png" alt="Starter solution" /></p>

<p>Nothing new so far, just File &gt; New project in Visual Studio. Next we want to setup these projects to have a Dapr sidecar.</p>

<h2 id="sidecars">Sidecars</h2>
<p>A sidecar in software development is an architectural pattern where a container has a helper container running alongside it. The helper container is responsible for handling a specific task. In the case of Dapr, the sidecar is responsible for handling all the Dapr runtime features. This way your application doesn’t have to worry about the Dapr runtime. Or, as explained on the Microsoft architecture website:</p>

<blockquote>
  <p>Deploy components of an application into a separate process or container to provide isolation and encapsulation. This pattern can also enable applications to be composed of heterogeneous components and technologies.</p>

  <p>This pattern is named Sidecar because it resembles a sidecar attached to a motorcycle. In the pattern, the sidecar is attached to a parent application and provides supporting features for the application. The sidecar also shares the same lifecycle as the parent application, being created and retired alongside the parent. The sidecar pattern is sometimes referred to as the sidekick pattern and is a decomposition pattern.</p>
</blockquote>

<p>Source: https://learn.microsoft.com/en-us/azure/architecture/patterns/sidecar</p>

<h2 id="running-a-dapr-enabled-platform">Running a Dapr-enabled platform</h2>
<p>Next, we need a way to launch everything within the Dapr context, so that Dapr knows it needs to start the sidecars. This is usually done by create a <code class="language-plaintext highlighter-rouge">dapr.yaml</code> file. A <code class="language-plaintext highlighter-rouge">dapr.yaml</code> file in the root of our solution. For our example it could look like this:</p>

<div class="language-yaml highlighter-rouge"><div class="highlight"><pre class="highlight"><code><span class="na">apps</span><span class="pi">:</span>
<span class="pi">-</span> <span class="na">appDirPath</span><span class="pi">:</span> <span class="s">DaprDemo.Api</span>
  <span class="na">appID</span><span class="pi">:</span> <span class="s">daprdemo-api</span>
  <span class="na">appPort</span><span class="pi">:</span> <span class="m">5105</span>
  <span class="na">command</span><span class="pi">:</span>
  <span class="pi">-</span> <span class="s">dotnet</span>
  <span class="pi">-</span> <span class="s">run</span>
<span class="pi">-</span> <span class="na">appDirPath</span><span class="pi">:</span> <span class="s">DaprDemo.Client</span>
  <span class="na">appID</span><span class="pi">:</span> <span class="s">daprdemo-client</span>
  <span class="na">appPort</span><span class="pi">:</span> <span class="m">5240</span>
  <span class="na">command</span><span class="pi">:</span>
  <span class="pi">-</span> <span class="s">dotnet</span>
  <span class="pi">-</span> <span class="s">run</span>
<span class="na">version</span><span class="pi">:</span> <span class="m">1</span>
</code></pre></div></div>
<p>In the <code class="language-plaintext highlighter-rouge">dapr.yaml</code> file we specify all our services, their ports and an appID. The appID is used by Dapr to identify the service.</p>

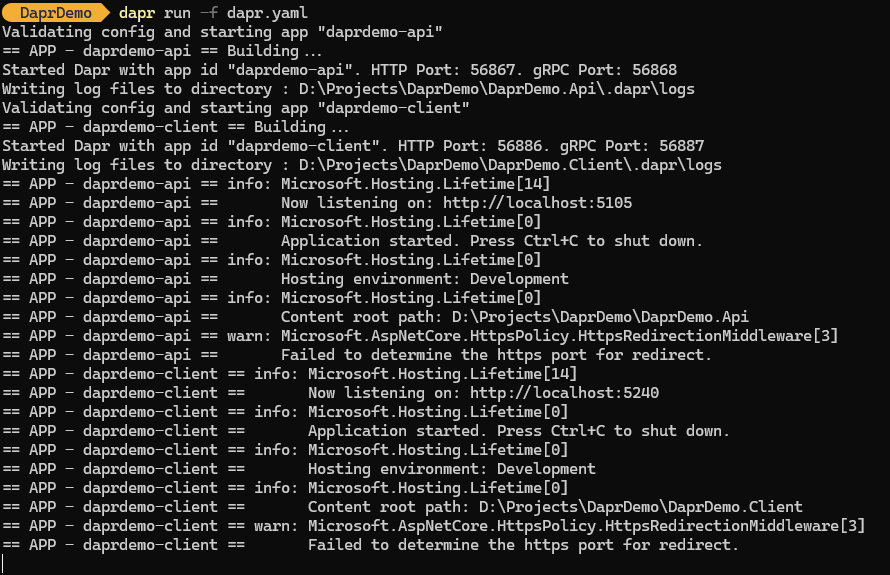
<p>Next we can run our entire set of Dapr-enabled services by using the Dapr CLI:</p>

<p><code class="language-plaintext highlighter-rouge">dapr run -f dapr.yaml</code></p>

<p>Which nets these results:
<img src="/assets/images/posts/20240403/002.png" alt="dapr run output" /></p>

<p>Everything is up and running!</p>

<h2 id="using-dapr-in-your-net-application">Using Dapr in your .NET application</h2>
<p>Now that we have our services running in the Dapr context, we can start using Dapr in our .NET application. The Dapr .NET SDK is available as a NuGet package. You can install it by running this command for our client project:</p>

<p><code class="language-plaintext highlighter-rouge">dotnet add package Dapr.AspNetCore</code></p>

<p>In this example we will modify the existing weather forecast sample page in the Blazor application to use Dapr. We’ll use this one since this is used as an example in both the minimal API and Blazor templates.</p>

<p>The Dapr .NET SDK for ASP.net Core provides a <code class="language-plaintext highlighter-rouge">DaprClient</code> class that can be used to interact with the Dapr runtime. The <code class="language-plaintext highlighter-rouge">DaprClient</code> class provides methods to invoke Dapr service-to-service invocation, state management, pub/sub, and bindings. Dapr provides an easy extension method to register that client in the DI container. In the <code class="language-plaintext highlighter-rouge">Program.cs</code> file of the Blazor application, we can add the following line:</p>

<div class="language-csharp highlighter-rouge"><div class="highlight"><pre class="highlight"><code><span class="n">builder</span><span class="p">.</span><span class="n">Services</span><span class="p">.</span><span class="nf">AddDaprClient</span><span class="p">();</span>
</code></pre></div></div>
<p>Once this is done we can inject the DaprClient in <code class="language-plaintext highlighter-rouge">Weather.razor</code>.</p>

<div class="language-csharp highlighter-rouge"><div class="highlight"><pre class="highlight"><code><span class="k">public</span> <span class="n">List</span><span class="p">&lt;</span><span class="n">WeatherForecast</span><span class="p">&gt;</span> <span class="n">Forecasts</span> <span class="p">{</span> <span class="k">get</span><span class="p">;</span> <span class="k">set</span><span class="p">;</span> <span class="p">}</span>

<span class="p">[</span><span class="n">Inject</span><span class="p">]</span>
<span class="k">public</span> <span class="n">DaprClient</span> <span class="n">Client</span> <span class="p">{</span> <span class="k">get</span><span class="p">;</span> <span class="k">set</span><span class="p">;</span> <span class="p">}</span>

<span class="k">protected</span> <span class="k">override</span> <span class="k">async</span> <span class="n">Task</span> <span class="nf">OnInitializedAsync</span><span class="p">()</span>
<span class="p">{</span>
    <span class="n">Forecasts</span> <span class="p">=</span> <span class="k">await</span> <span class="n">Client</span><span class="p">.</span><span class="n">InvokeMethodAsync</span><span class="p">&lt;</span><span class="n">List</span><span class="p">&lt;</span><span class="n">WeatherForecast</span><span class="p">&gt;&gt;(</span><span class="n">HttpMethod</span><span class="p">.</span><span class="n">Get</span><span class="p">,</span> <span class="s">"daprdemo-api"</span><span class="p">,</span> <span class="s">"weatherforecast"</span><span class="p">);</span>
<span class="p">}</span>
</code></pre></div></div>

<p>Using the <code class="language-plaintext highlighter-rouge">InvokeMethodAsync</code> method we can call the <code class="language-plaintext highlighter-rouge">weatherforecast</code> endpoint of the <code class="language-plaintext highlighter-rouge">daprdemo-api</code> service. The <code class="language-plaintext highlighter-rouge">InvokeMethodAsync</code> method takes the HTTP method, the appID of the service, and the endpoint to call. It also specifies what the expected result type is. The Dapr .NET SDK will handle the call to the backend, via the Dapr sidecar, and deserializes the result.</p>

<p>If we now run the project again using the Dapr CLI, and navigate to the weather page, we should see the weather forecast data provided by the backend.</p>

<h2 id="running-and-debugging-from-visual-studio">Running and debugging from Visual Studio</h2>
<p>So far, we have been developing a Dapr-based platform, using the Dapr CLI to run our applications. However, this is not the experience we as .NET developers are used to. We want to be able to run our services from Visual Studio. Luckily, Microsoft has provided a Visual Studio extension that does this. The extension is open-source and can be found on GitHub:
https://github.com/microsoft/vs-dapr. The extension is still in preview, but I found it to work quite well.</p>

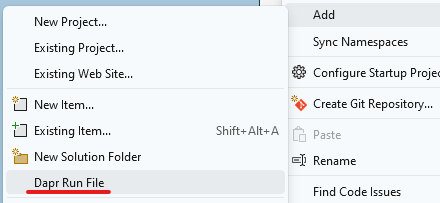
<p>Once installed, we will get a right-click menu item on solution level to generate a <code class="language-plaintext highlighter-rouge">dapr.yaml</code> file. This file will be generated based on the projects in the solution.</p>

<p><img src="/assets/images/posts/20240403/003.png" alt="New menu item" /></p>

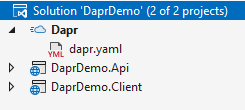
<p>The <code class="language-plaintext highlighter-rouge">dapr.yaml</code> file will be generated in a virtual Dapr project in the Solution Explorer. This project can be set as startup project, When you press F5 in Visual Studio you will see the debugger launching. In the background all of your services are launching, together with their Dapr sidecars.</p>

<p><img src="/assets/images/posts/20240403/004.png" alt="Solution with Dapr project" /></p>

<p>What the extension doesn’t do so far is actually launching a browser window for your frontend or Swagger page. But we know the ports it’s running on, so we can navigate to the correct URL ourselves.</p>

<h2 id="conclusion">Conclusion</h2>
<p>In this post, we’ve seen how to get started with the Dapr .NET SDK. We’ve seen how to setup a Dapr-enabled platform, how to use Dapr in your .NET application, and how to run and debug your Dapr-enabled platform from Visual Studio. The Dapr .NET SDK provides a more programming language-driven way to interact with Dapr, and the Dapr CLI provides an easy way to run your Dapr-enabled platform. The Visual Studio extension makes it easy to run and debug your Dapr-enabled platform from Visual Studio.</p>]]></content><author><name>Nico Vermeir</name></author><category term="dapr" /><summary type="html"><![CDATA[Intro In this post, we’ll take a look at the Dapr .NET SDK. Dapr is a portable, event-driven runtime that makes it easy for developers to build resilient, microservices applications.]]></summary></entry><entry><title type="html">Setting generated project name in .NET Aspire</title><link href="https://www.nicovermeir.be/aspire/2024/03/21/setting-aspire-project-name.html" rel="alternate" type="text/html" title="Setting generated project name in .NET Aspire" /><published>2024-03-21T12:59:18+00:00</published><updated>2024-03-21T12:59:18+00:00</updated><id>https://www.nicovermeir.be/aspire/2024/03/21/setting-aspire-project-name</id><content type="html" xml:base="https://www.nicovermeir.be/aspire/2024/03/21/setting-aspire-project-name.html"><![CDATA[<h2 id="intro">Intro</h2>
<p>We have been building a microservices application with .NET Aspire. With .NET Aspire you get an AppHost project that references all of your services and web applications. The AppHost project, by default, generates a <code class="language-plaintext highlighter-rouge">Projects</code> namespace with a class for every project that the AppHost references. This is a great way to access your services and web applications in a strongly typed way.</p>

<p>Let’s assume a .NET Aspire project with a web application called <code class="language-plaintext highlighter-rouge">WebApp</code> and a service called <code class="language-plaintext highlighter-rouge">Service</code>. The generated Projects namespace will look like this:</p>

<div class="language-csharp highlighter-rouge"><div class="highlight"><pre class="highlight"><code><span class="k">namespace</span> <span class="nn">Projects</span><span class="p">;</span>

<span class="p">[</span><span class="k">global</span><span class="p">::</span><span class="n">System</span><span class="p">.</span><span class="n">Diagnostics</span><span class="p">.</span><span class="nf">DebuggerDisplay</span><span class="p">(</span><span class="s">"Type = {GetType().Name,nq}, ProjectPath = {ProjectPath}"</span><span class="p">)]</span>
<span class="k">public</span> <span class="k">class</span> <span class="nc">Service</span> <span class="p">:</span> <span class="k">global</span><span class="p">::</span><span class="n">Aspire</span><span class="p">.</span><span class="n">Hosting</span><span class="p">.</span><span class="n">IProjectMetadata</span>
<span class="p">{</span>
  <span class="k">public</span> <span class="kt">string</span> <span class="n">ProjectPath</span> <span class="p">=&gt;</span> <span class="s">"""d:\projects\AspireDemo\Service\Service.csproj"""</span><span class="p">;</span>
<span class="p">}</span>
</code></pre></div></div>

<p>In the AppHost project, you can now access the <code class="language-plaintext highlighter-rouge">Service</code> project like this:</p>

<div class="language-csharp highlighter-rouge"><div class="highlight"><pre class="highlight"><code><span class="kt">var</span> <span class="n">service</span> <span class="p">=</span> <span class="n">builder</span><span class="p">.</span><span class="n">AddProject</span><span class="p">&lt;</span><span class="n">Projects</span><span class="p">.</span><span class="n">Service</span><span class="p">&gt;(</span><span class="s">"service-api"</span><span class="p">);</span>

<span class="n">builder</span><span class="p">.</span><span class="n">AddProject</span><span class="p">&lt;</span><span class="n">Projects</span><span class="p">.</span><span class="n">AspireDemo_Web</span><span class="p">&gt;(</span><span class="s">"webfrontend"</span><span class="p">)</span>
    <span class="p">.</span><span class="nf">WithReference</span><span class="p">(</span><span class="n">service</span><span class="p">);</span>
</code></pre></div></div>

<p>As you can see, pretty nifty usage of code generators to provide a strong-typed way of hooking services up to each other.</p>

<h2 id="the-issue">The issue</h2>
<p>However, in our microservices based application we ran into the issue that we had multiple services with the same name. Apparently the code generators in .NET Aspire only generate the class for one of the two. I’ve reproduced this issue in a project for demo purposes.</p>

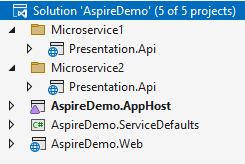
<p>Given this solution</p>

<p><img src="/assets/images/posts/20240321/001.png" alt="solution explorer" /></p>

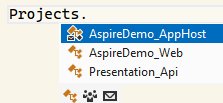
<p>These are the classes generated in the <code class="language-plaintext highlighter-rouge">Projects</code> namespace:</p>

<p><img src="/assets/images/posts/20240321/002.png" alt="generated projects" /></p>

<p>Only one project to be found. Our initial workaround was using the <code class="language-plaintext highlighter-rouge">WithReference</code> method with the project path instead of the generated class. This works, but it’s not as clean as using the generated class. Luckily there is a change that we can make in the <code class="language-plaintext highlighter-rouge">csproj</code> file of the AppHost to fix this.</p>

<p>By adding <code class="language-plaintext highlighter-rouge">AspireProjectMetadataTypeName</code> to the project references, we can specify the name of the generated class. This way we can have multiple services with the same name in the AppHost project.</p>

<div class="language-xml highlighter-rouge"><div class="highlight"><pre class="highlight"><code><span class="nt">&lt;ItemGroup&gt;</span>
  <span class="nt">&lt;ProjectReference</span> <span class="na">Include=</span><span class="s">"..\AspireDemo.Microservice1\Presentation.Api\Presentation.Api.csproj"</span> <span class="na">AspireProjectMetadataTypeName=</span><span class="s">"MicroService1"</span> <span class="nt">/&gt;</span>

  <span class="nt">&lt;ProjectReference</span> <span class="na">Include=</span><span class="s">"..\AspireDemo.Microservice2\Presentation.Api\Presentation.Api.csproj"</span> <span class="na">AspireProjectMetadataTypeName=</span><span class="s">"MicroService2"</span> <span class="nt">/&gt;</span>

  <span class="nt">&lt;ProjectReference</span> <span class="na">Include=</span><span class="s">"..\AspireDemo.Web\AspireDemo.Web.csproj"</span> <span class="nt">/&gt;</span>
<span class="nt">&lt;/ItemGroup&gt;</span>
</code></pre></div></div>

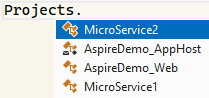
<p>After adding the <code class="language-plaintext highlighter-rouge">AspireProjectMetadataTypeName</code> attribute to the <code class="language-plaintext highlighter-rouge">ProjectReference</code> elements, the generated classes will look like this:</p>

<p><img src="/assets/images/posts/20240321/003.png" alt="generated projects" /></p>

<p>Exactly what we needed. Now we can reference our services in a strongly typed way in the AppHost project.</p>

<h2 id="conclusion">Conclusion</h2>
<p>.NET Aspire is a great way to build microservices applications. The generated <code class="language-plaintext highlighter-rouge">Projects</code> namespace provides a great help to hook up your different services in a strongly typed way.</p>

<p>However, when you have multiple services with the same name, you’ll run into issues.</p>

<p>By adding the <code class="language-plaintext highlighter-rouge">AspireProjectMetadataTypeName</code> attribute to the <code class="language-plaintext highlighter-rouge">ProjectReference</code> elements in the AppHost project, you can specify the name of the generated class. This way you can have multiple services with the same name in the AppHost project.</p>

<p>Happy coding!</p>]]></content><author><name>Nico Vermeir</name></author><category term="aspire" /><summary type="html"><![CDATA[Intro We have been building a microservices application with .NET Aspire. With .NET Aspire you get an AppHost project that references all of your services and web applications. The AppHost project, by default, generates a Projects namespace with a class for every project that the AppHost references. This is a great way to access your services and web applications in a strongly typed way.]]></summary></entry><entry><title type="html">Relaunching my blog with Jekyll</title><link href="https://www.nicovermeir.be/jekyll/update/2024/03/20/welcome-to-jekyll.html" rel="alternate" type="text/html" title="Relaunching my blog with Jekyll" /><published>2024-03-20T14:59:18+00:00</published><updated>2024-03-20T14:59:18+00:00</updated><id>https://www.nicovermeir.be/jekyll/update/2024/03/20/welcome-to-jekyll</id><content type="html" xml:base="https://www.nicovermeir.be/jekyll/update/2024/03/20/welcome-to-jekyll.html"><![CDATA[<p>It’s been ages since I was blogging, I’ve been more focusses on visiting conferences as a speaker and organizing different community events.
Since it was getting hard to keep track of everything I’m doing, I decided to relaunch my blog with Jekyll. This way I can keep track of all my speaking engagements and share my experiences with the community.</p>

<p>My old blog used to run on Jekyll as well, with a portable Jekyll / Ruby setup, but that project seems to have been abandoned by the authors. However, times have changed and this time around I’m developing my blog and writing my posts using DevContainers in Visual Studio Code. This way I just need to configure what base image to use, Docker will spin up a container configured with everything I need to write and test my blog posts. Visual Studio Code connects to the container and I can start writing my posts.</p>

<p>I’m excited to share my experiences with you, both technical and as a speaker / organizer, and I hope you’ll enjoy reading my posts as much as I enjoy writing them.</p>]]></content><author><name>Nico Vermeir</name></author><category term="jekyll" /><category term="update" /><summary type="html"><![CDATA[It’s been ages since I was blogging, I’ve been more focusses on visiting conferences as a speaker and organizing different community events. Since it was getting hard to keep track of everything I’m doing, I decided to relaunch my blog with Jekyll. This way I can keep track of all my speaking engagements and share my experiences with the community.]]></summary></entry></feed>